Reposted from my
blog:
No chicken jokes this time.

Here be worms.
 wormbin1
 by
merriwether, on Flickr
Today's project is a
vermiculture worm bin. I've been wanting to raise worms for a while, mainly for fishing but also for the great soil they produce from kitchen fruit/veggie scrapes.
So, worm bins. They are easy to make out of two identical, opaque plastic bins, shredded newspaper, and something that will make holes in two different sizes (1/4" and 1/16" diameter). The ideal bins would only be about a foot deep but as wide as possible to maximize the surface area. Right now Walmart, Target, Home Depot and other stores all have their "Christmas storage bins" on clearance dirt cheap (ha ha ha) so it's a great time to tackle (ha ha ha...fishing joke...worms...get it) this project. You want opaque bins as worms hate light and won't act naturally or even die if exposed to too much light.
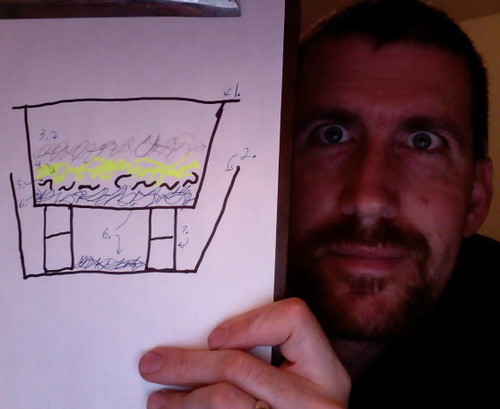 WormBinSketch
 by
merriwether, on Flickr
1. inner bin
2. outer bin
3. loosely wadded up strips of damp newspaper
4. fruit/veggie waste
5. red wiggler worms
6. worm casings (aka worm poop) both in inner and outer bin
7. bricks or other thing to lift up inner bin
The key to a healthy worm bin is ventilation, hence lots of air holes are drilled in both bins. The holes in the wall of the outer bin should be 1/4" in diameter but only 1/16" in the walls and lid of the inner bin. If you use holes larger than 1/16" on the inner bin the worms will crawl out which leads to dried out worm carcasses all over. Yucky. Also drill about twenty or thirty 1/4" holes in the BOTTOM of the inner bed to allow the processed worm casings to fall into the outer bin. Occasionally you'll have a worm drop into the outer bin, too. Oh well.
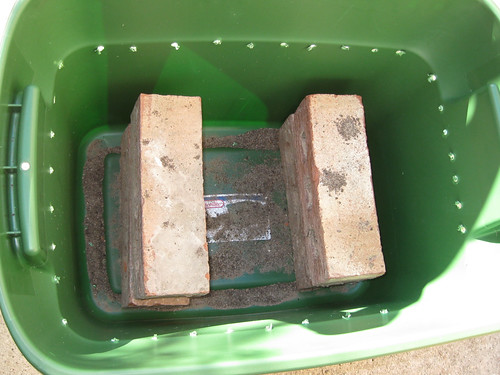 wormbin5
 by
merriwether, on Flickr
Outer bin with brick risers in place. The risers raise the inner bin away from the outer bin to increase air flow to the inner bin.
There are several ways to get red wigglers, I bought mine from a bait shop. If you do this make sure you don't buy the big nightcrawlers used for bass fishing as they won't eat you kitchen waste. You'll want the smaller worms used for trout and pan fish. If you don't want to buy the worms you can gather your own from the wild. Look in/under compost or manure piles or just lay some wet cardboard down on the grass for a day or too. When you lift it there will likely be a number of red wigglers under it. Lastly, there are a bunch of places online that will
sell you pounds of red wigglers. I've never tried any of them so I can't recommend a particular one. Most plans call for starting out with one pound of worms.
Place the worms and the media they came in in the bottom of the inner bin. If you caught them yourself then put a 1" layer of damp earth in the bottom of the bin. This soil shouldn't be dripping wet nor dusty dry. Aim for somewhat clumpy.
 wormbin4
 by
merriwether, on Flickr
Worms, now home. Note all the ventilation holes.
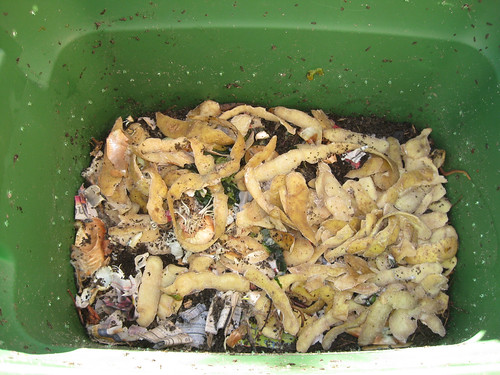 wormbin3
 by
merriwether, on Flickr
Worm food: potato peels, lettuce, and a few other scraps.
One pound of worms will eat 1/2 pound of kitchen waste every day. Some people add their scraps every day, others collect about 3-days worth of kitchen waste before added it to the bins to minimize annoying/disturbing the worms. Do whatever you significant other tells you to do. It's just easier that way. Once you have a large, hungry horde of worms you can expand you scraps to include meat and other non-plant matter.
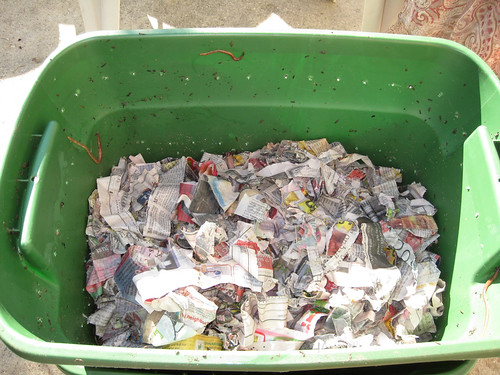 wormbin2
 by
merriwether, on Flickr
Newspaper layer. Yes, worms are excellent climbers.
Cover everything with 2"-3" of shredded newspaper. Cut the newspaper into 1" strips, soak them in water, squeeze them out to "damp sponge" wetness, loosely wad them up and toss them in the bin. Don't use glossy advertisements as they don't dampen well and the inks may be somewhat toxic.
That's about it. Store the bins in a dark area where they will neither freeze nor overheat. They can handle temperatures close to 30F and as high as 100F but will stop breeding at these temperatures. Under ideal conditions your worm population will double every 90 days. Note that like with every other creature, worms don't like living in their own excrement. You'll have to empty the inner bin about every 4 months to keep your worms healthy. Worm casings are loaded with beneficial microbes and nutrients vital to plants, often having five times as much nitrogen, seven times as much phosphorus, and eleven times as much potassium as ordinary dirt, making it a wonderful natural fertilizer.
Worm bins should have a nice, earthy smell to them. If an unpleasant odor is noticed you've probably been overfeeding the worms. Don't add any scraps for several days until the current material has been consumed. Also check that your system isn't too wet. If it is more than just damp add some more shredded newspaper to absorb excess moisture. My problem in Houston is the system drying out so I keep a spray bottle of water next to the bin to dampen the newspaper as needed.
-Blast


 Previous Topic
 Index
Index


