Equipped To Survive Equipped To Survive® Presents
The Survival Forum
Where do you want to go on ETS?

Topic Options
#88941 - 03/20/07 09:23 PM Improvised battery holder
CJK Offline
Addict

Registered: 08/14/05
Posts: 601
Loc: FL, USA
Recently came across a 'kids' book that was about power and motors or something like that. With the book were some supplies that included a 'battery holder'. I took notice that the holder was nothing more than a film canister. It seems that an ordinary film canister very neatly holds a "C" size battery. While that may not seem like 'much'...I did notice that it holds the battery in such a way that you could put wire in at the bottom and place the battery in on top and then place another wire on top and when the top is squeezed on, it makes some nice electrical contact (you may need to put in a folded piece of paper to get a really good contact). I've had some trouble in the past of trying to make some improvised electrical connections on the ends of the battery with tape (who hasn't)...but it never worked well. This seems to solve that. It opens the door of how to connect relatively securely to a battery with a minimum of difficulty. Seems it would work well for a kids science project too.....save some money.

Top
#88972 - 03/21/07 02:02 AM Re: Improvised battery holder [Re: CJK]
Alex Offline
Old Hand

Registered: 03/01/07
Posts: 1034
Loc: -
Nice find!
I'm using even simpler method which works well with any number of any round batteries (D,C,AA,AAA...). Just roll one or several of them in several layers of thin paper with glue. When dried, remove the batteries and insert the negative wire end so its bare part makes a loop over the negative (flat) end of the first battery. Thread it all the way out over the top edge of the tube. Use a dead (or spare) battery to make the top (positive) connection. See the image:
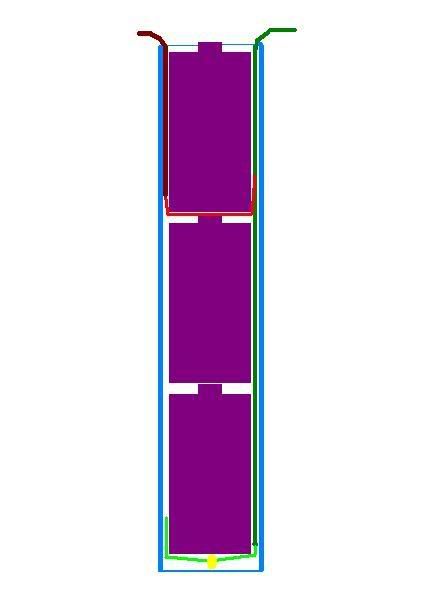


blue - paper tube;
green - negative wire;
red - positive wire;

The wires provides tight fit for the batteries in the tube.
So, it's better to route the positive wire in parallel to the negative one, on the one side of the tube (opposite to what is shown on the picture just for clarity).

Some improvements:
- If the negative wire is too soft, I'm using a small nut (yellow) on it.
- If the wire is too thin, I'm using additional long paper strips as shims.
- You can poke holes in the tube to secure the open ends of the wires.
- You can cut off the bottom of the dead battery to reduce the assembly size.
- No glue? Use some tape over the paper tube.


Edited by Alex (03/21/07 02:33 AM)

Top


Moderator:  Alan_Romania, Blast, cliff, Hikin_Jim 
November
Su M Tu W Th F Sa
1 2
3 4 5 6 7 8 9
10 11 12 13 14 15 16
17 18 19 20 21 22 23
24 25 26 27 28 29 30
Who's Online
0 registered (), 747 Guests and 12 Spiders online.
Key: Admin, Global Mod, Mod
Newest Members
Aaron_Guinn, israfaceVity, Explorer9, GallenR, Jeebo
5370 Registered Users
Newest Posts
Leather Work Gloves
by KenK
11/24/24 06:43 PM
Satellite texting via iPhone, 911 via Pixel
by Ren
11/05/24 03:30 PM
Emergency Toilets for Obese People
by adam2
11/04/24 06:59 PM
For your Halloween enjoyment
by brandtb
10/31/24 01:29 PM
Chronic Wasting Disease, How are people dealing?
by clearwater
10/30/24 05:41 PM
Things I Have Learned About Generators
by roberttheiii
10/29/24 07:32 PM
Newest Images
Tiny knife / wrench
Handmade knives
2"x2" Glass Signal Mirror, Retroreflective Mesh
Trade School Tool Kit
My Pocket Kit
Glossary
Test

WARNING & DISCLAIMER: SELECT AND USE OUTDOORS AND SURVIVAL EQUIPMENT, SUPPLIES AND TECHNIQUES AT YOUR OWN RISK. Information posted on this forum is not reviewed for accuracy and may not be reliable, use at your own risk. Please review the full WARNING & DISCLAIMER about information on this site.