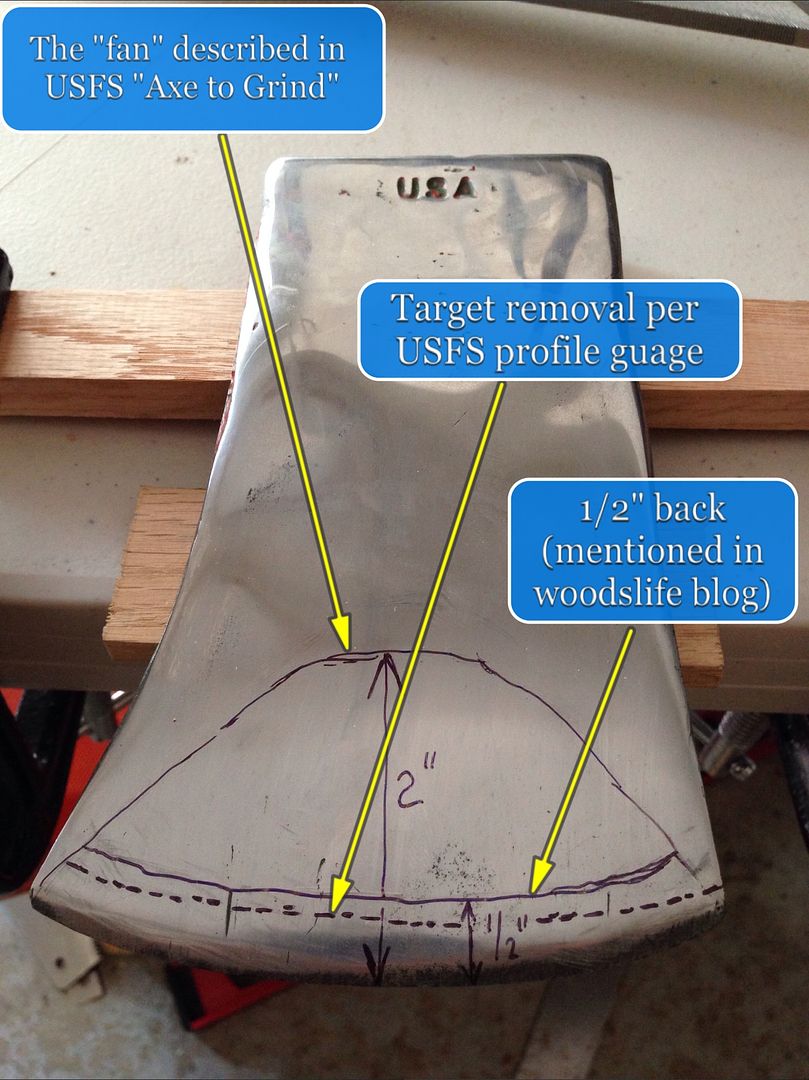
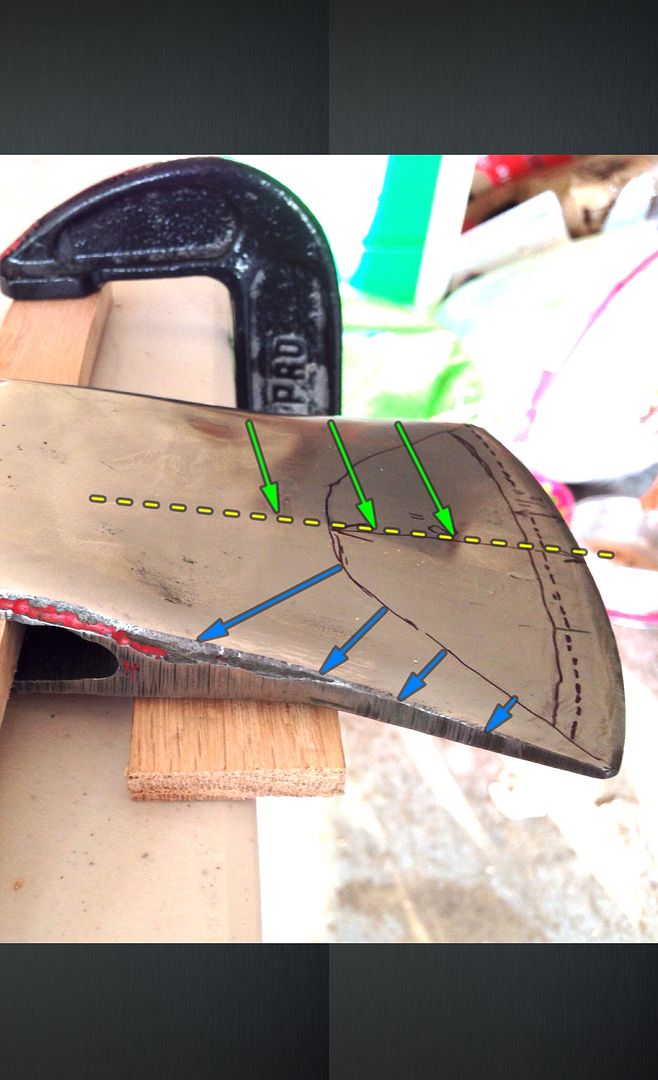
With the detailed articles from USFS and Woodslife on my mind, I setup my work area for filing the bit and cheek to match the bit gauge. Im working with an improvised work area, so I used a couple clamps and an oak scrap to fasten the head to the table. I sketched a number of lines on the bit and cheek with a fine tipped sharpie as you can see below. First, from about 2 from the blade and out to the toe and heel of the blade I sketched the half-moon shape referred to by USFS as the zone that will get filed when rehabbing an axe head. I also marked with a dashed line where the USFS edge gauge hits the bit (ie. where initial thinning is needed). In the Axe to Grind video, USFS demonstrates a filing motion that generally begins at the edge then follows the convex towards the cheek (while maintaining file direction straight towards poll not at an angle to it). He shows how the gauge is used to identify where the cheek needs to be thinned. The video does not go into detail with regard to the differences in technique when sharpening vs. re-profiling. This is the main difference in the Woodslife blog, where the author separates the processes and zones of cheek re-profiling vs. convex bit sharpening (both zones to be seamlessly transitioned eventually). He generally sets the boundary between the two areas at ½ from the edge. For this reason I marked the point ½ from the edge with the Sharpie (see photo). You can see that its very close to the dashed line. Since I seek to match the edge gauge, I will target the dashed line while keeping the ½ line in mind!
With these guide lines drawn, I set the file on the head as shown below in the orientation demonstrated by USFS. The file is touching at the dashed line where I will be removing material, and just about hits the cheek ALSO at the eye (see photo below). For this reason I decided to wrap the head in tape to protect this area before filing.
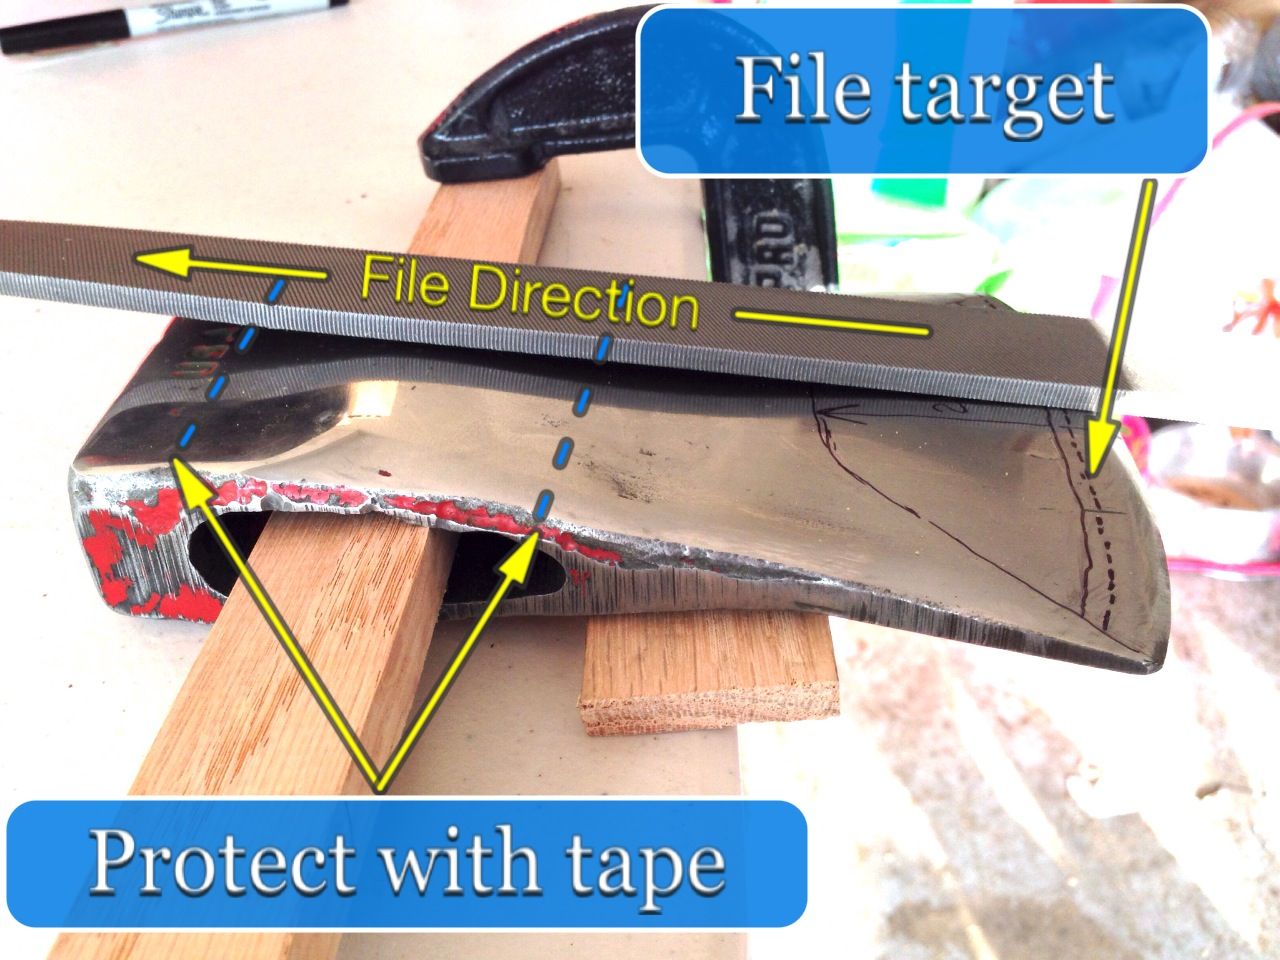
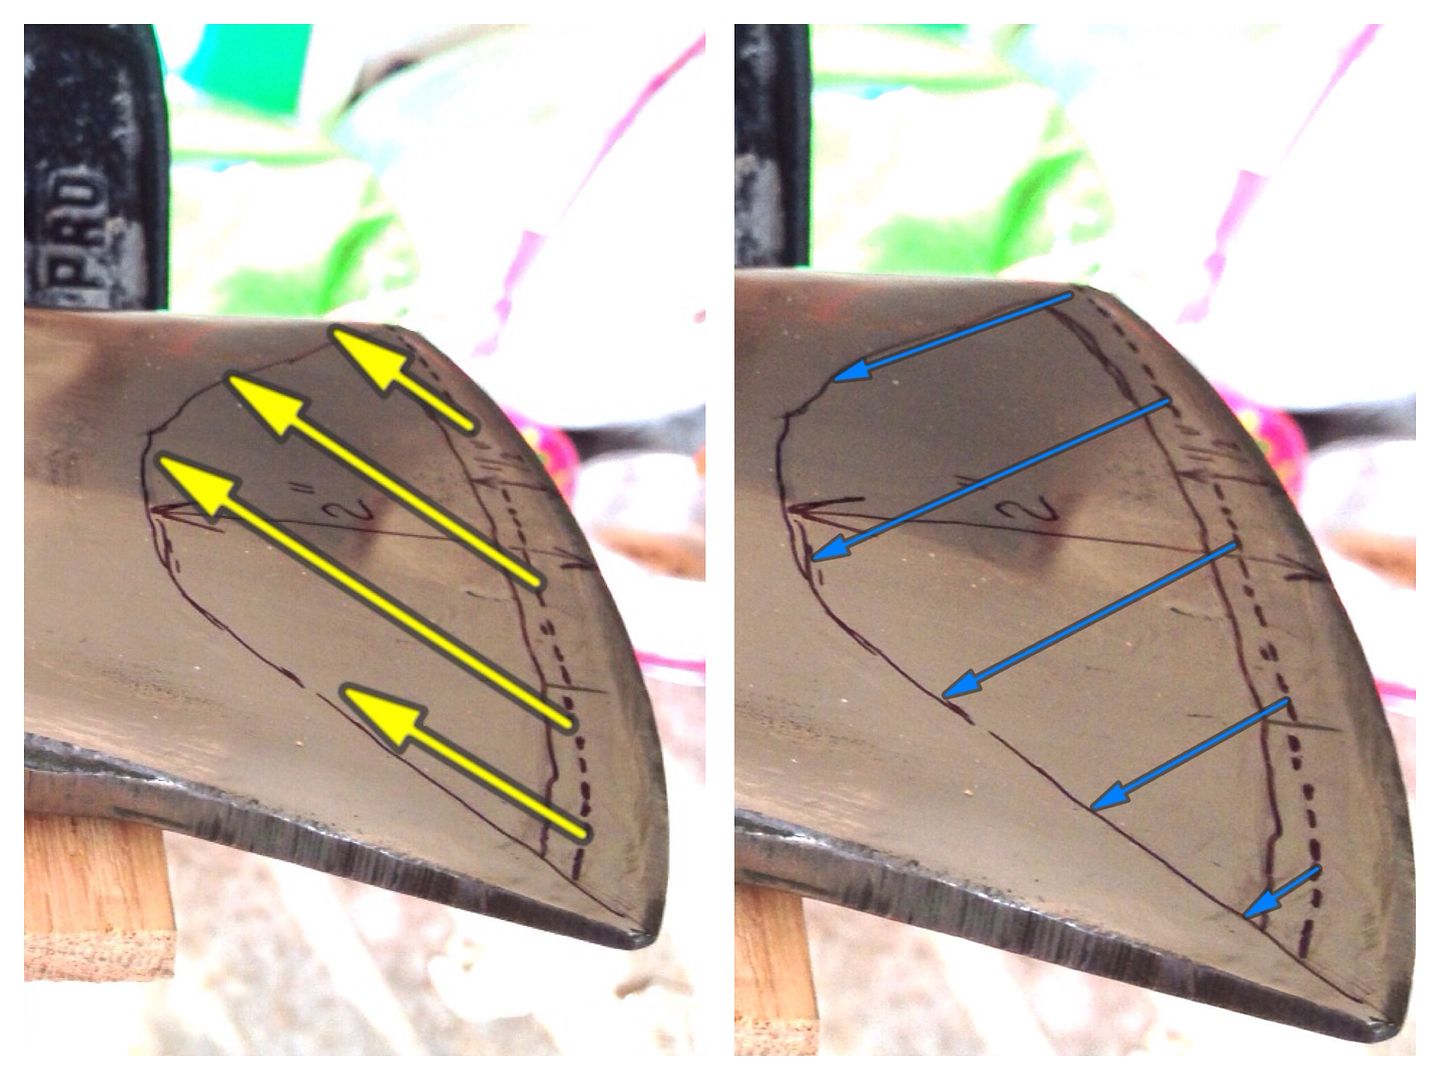
Even so, it will be difficult to use the full length of the file if I maintain the straight direction because the end will be running into this area. LESSON learned better to do all this before sanding the head to the desired finish (mirror in this case!). Another thing this exercise demonstrates to me there is obvious merit in the Woodslife articles recommendation to also include angular file directions to remove cheek metal (best seen as the yellow and blue arrows on the next two photos). Of course this now brings the clamps into play as obstacles. May need a longer piece of wood through the eye to get clamps out of the way!
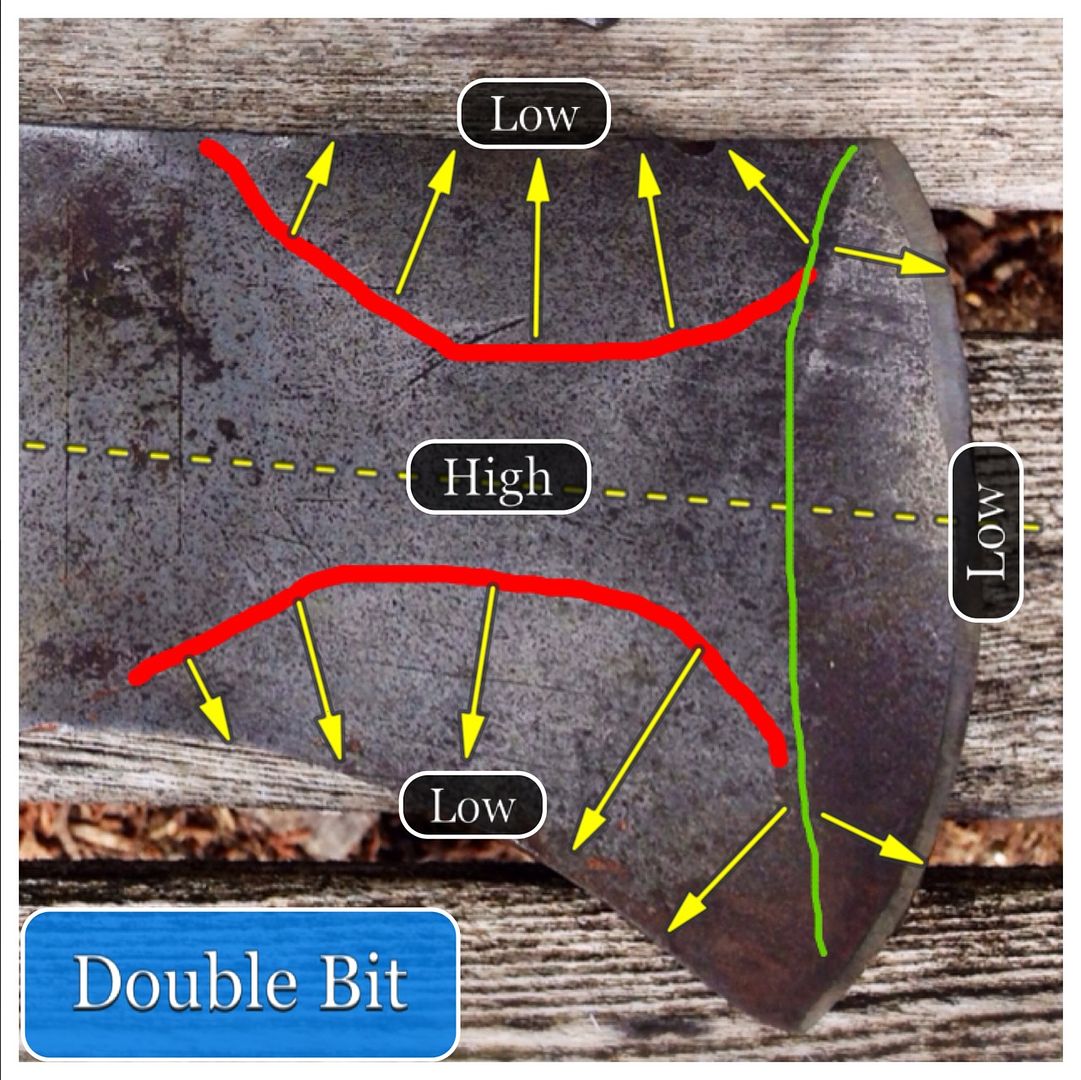
I spent a few moments lightly running the file last night. It quickly became apparent that I was not obtaining the half-moon shaped described by USFS. Rather than blindly filing away, I decided to stop and take stock. After all, you can always remove more steel but you cant put it back on, right? I could see the makings of the fan shape it on the Heel, but not really the Toe. I pulled out my Collins Double Bit in order to study it, since it is the same style axe head being refurbished in the USFS video. It was immediately apparent that the symmetry and contour of the cheek would indeed lend itself to the formation of the half-moon shape upon filing (see photo below). The picture is worth a thousand words, but essentially the green line represents the ridge that would form from filing due to the low areas on each side of the centerline from bit to poll.
Now the contours of the top face of the Council are quite different. In the photo below, the blue arrows on the heel side of the head show the downward slope of the cheek from my fan sharpie line. This side is forming more of the fan shape during filing which is logical based on my study of the Collins. The Toe side of the head does not slope symmetrically away from the line, like it did on the Collins. As a result, the symmetrical half-moon is not forming. Now I ask myself if it matters AND I immediately answer myself I think not! I believe the statement in the USFS video about the desired half-moon shape applies to the double bit head he was working on; and may as well for other designs just not mine. I just think its more of a general concept than an absolute truth. Im going back to the effort, focusing on filing to get that bit to fit the gauge and less on trying to force the half-moon shape.
Please forgive me if you find these minutia or my projects pace annoying, I dont have the benefit of a mentor in these ways. If I had someone right there in person Id have asked a few pointed questions at the right time and moved on with it!


 Previous Topic
 Index
Index


