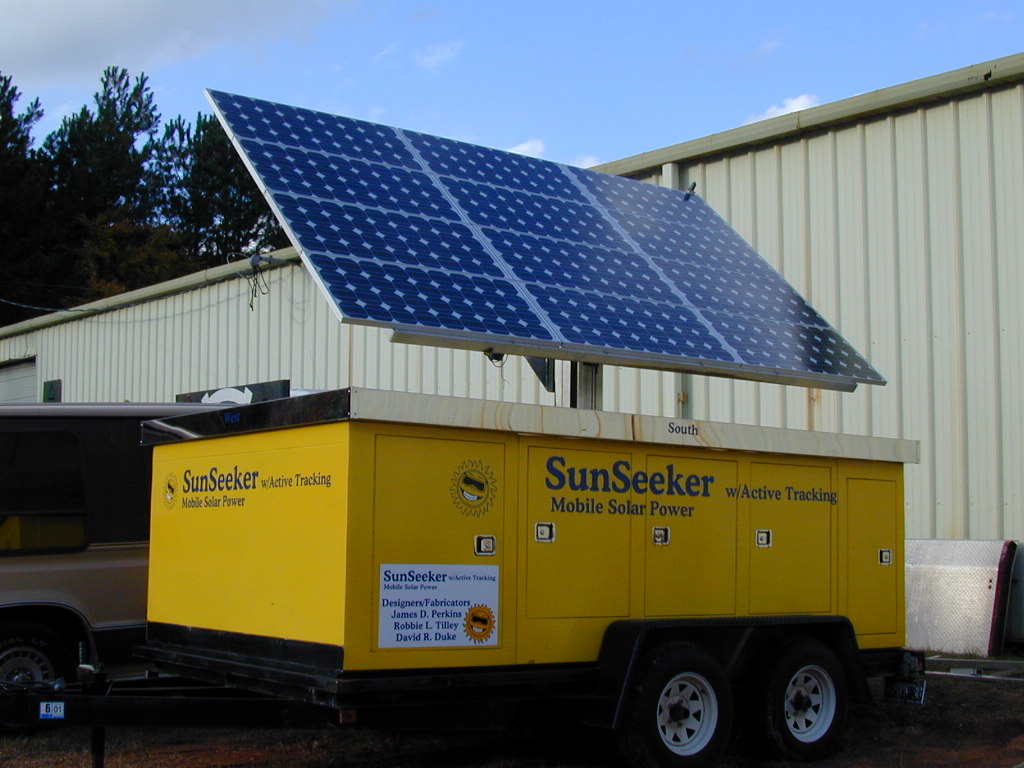
Solar Electricity, A RV'ers Perspective. (Preface)

Posted by: Nomad

Solar Electricity, A RV'ers Perspective. (Preface) - 08/23/09 04:25 PM

Preface:
Gloria and I live in a camper. We have no other home. We left Maine in August of 1997 which makes this out 13th year on the road. Our preference is for the wild places. Of course there is no electricity in the wild places, so we have become very dependent on our solar electrical system.

For the most part, we have enough power to live a normal life. We have a 22” flat screen TV. Our internet connection is via satellite. We both have amateur radio licenses and use radio a lot. Our computer network uses power and so does our reverse osmosis water system. Because I did stupid things on motorcycles, I need to use a breathing machine (CPAP) when sleeping. All of this uses power.

My background is in technology and my work provided ample opportunity to learn about batteries and such. In Maine I had a very large battery bank driven by solar cells, so I have been messing with this stuff for a long time. Hopefully I have gained some useful information and techniques.

Powering a RV with solar has some unique issues. It is different than powering a home. So what I will provide here is my perspective on RV Solar.

I appreciate the opportunity to present this to the Equipped group for critical comment. I intend to eventually put it on my web site where it will be easy to maintain, edit and add pictures. It is a work in progress and I sincerely appreciate discussion on the topic.

I have done a bit of technical writing I had an editor that repaired my typos and misplaced punctuation. If you are a habitual proofreader I would welcome your corrections. Please do that via private e-mail so as not to clutter up the dialog. Use n1ahh.ron@gmail for that and any other comments that do not need to go to the whole group.

I will post this is sections so questions can be asked and discussed. So lets begin at the beginning.
---Nomad---
Posted by: Nomad

Re: Solar Electricity, A RV'ers Perspective. 1. - 08/23/09 04:40 PM

Solar System Description:

A solar system consists of several components

A solar array, sometimes called a photo voltaic (PV) array. This consists of one or more solar panels wired together in one of several ways (discussed later).

Wire: The most overlooked part of the system. Do this part right and it will make a great deal of difference.

Solar Controller: Electricity from the solar panels must be regulated before it gets to the batteries or they will overcharge and be destroyed. The solar controller oversees the charging process.

Batteries: A very complex subject. There are lots of types, models and technologies to consider.

Inverter: The electricity in the solar system is DC or direct current. Many appliances need AC or alternating current. An inverter changes the DC to AC.

Metering: Although the system basically runs itself, you need to know how much power you have available and you need to monitor the system to detect any problems.

The components, one by one:

Solar Arrays:

Panel types:
There are several types of solar panels. Some of the characteristics include, power output per square inch, break ability, shadow performance , and cost,to name a few.

Basically they fall into two groups. I will call them Mono-crystalline (MC) and Thin Film (TF) .

Mono-crystalline(MC) are the most common type. The array consists of many individual cells wired together to form a panel. MC are cheaper and provide more power than Thin Film (TC) panels.

The disadvantages of MC are that they are more fragile, they do not have diodes between each cell and therefore have a severe power loss when even partially shaded and they do not produce as much energy when the sky is overcast or in other reduced light situations.

The cells are sandwiched between an aluminum support sheet and a tempered glass covering. They are rigid and although the tempered glass is pretty strong, can be (and frequently are) broken when used in the RV environment. The cells are mostly sensitive to visible light with limited production under ultraviolet and infrared light.

Thin Film(TF) panels are used in severe service environments. Marine and military applications are the most common. TF panels are one continuous multi-cell layer, sliced very thin and then bound with other thin films to produce a multi-layered surface.

Each cell within the film has a diode between it and the other cells. This diode greatly reduces the effect of shading. The thin film layers are flexible and can be put on rounded surfaces. They are covered with a very strong plastic protective layer. Mine have many large gouges and “pings” from hitting trees, dropped wrenches and other hazards that would have destroyed the glass covered MC panels.

The multi layers are sensitive to different wavelengths of light, allowing much better performance in overcasts where the amount of visible light is reduced but light of other wavelengths remain high.

There are two major disadvantages to TF panels. One is their lower power output per area. I have TF panels and they occupy about twice the roof real estate the MC would occupy for the same output.

Second, TF panels cost about twice the price of MC panels for a given output. My 64 watt panels cost about $350 each whereas a 120 watt MC panel would cost about $550. These are old prices, all have gone up considerably but the same ratio of costs remains.

Next: Mounting the Panels.
Posted by: Desperado

Re: Solar Electricity, A RV'ers Perspective. 1. - 08/23/09 05:31 PM

Next slide please...

This has just recently come to the front of issues for me, and I need to have something going in the next week or so.
Posted by: Todd W

Re: Solar Electricity, A RV'ers Perspective. 1. - 08/23/09 07:11 PM

Awesome!!! Looking great so far!!!

I just climbed up on my RV and realized either my grandfather or previous owner covered the entire top in Aluminum so mounting may be fun for me, I am looking forward to your advise smile

Posted by: falcon5000

Re: Solar Electricity, A RV'ers Perspective. 1. - 08/23/09 10:19 PM

Great post so far Nomad, keep it coming. I can relate to the 2 type panels, I have both as well and I am more to the thin film when traveling and my thin film definitely works really well in clouded conditions. I use a 20 watt TF to keep my truck charged in storage and I can go to my truck 6 months later and it fires right up with the battery. I am hoping as technology improves that solar comes down in price, I'll be all over that. Wind mills and solar, unfortunately turbines won't work well here due to the lack of constant wind. but we have plenty of sun.
Posted by: Todd W

Re: Solar Electricity, A RV'ers Perspective. 1. - 08/24/09 12:15 AM

I just cleared a nice area for my RV and realized I have a small problem... it's under very tall pine and oak trees and gets little sun. Sure, I could have parked it in the sun but then I have to deal with the heat, and problems associated with items left in the sun for long periods of time.

What do you for this scenario?

Do you have a panel or two that can be unhooked and wired-up 100ft or so away in the sun? (This is what I`m thinking about.)

Posted by: Am_Fear_Liath_Mor

Re: Solar Electricity, A RV'ers Perspective. 1. - 08/24/09 12:42 AM

Do you mean something like this. grin


900 Watts of Solar PV with solar tracking and combined 6500 Watt Backup Generator and battery bank giving 4KW of power.

http://www.mobilesolarpower.com/

Posted by: Todd W

Re: Solar Electricity, A RV'ers Perspective. 1. - 08/24/09 12:45 AM

Originally Posted By: Am_Fear_Liath_Mor
Do you mean something like this. grin


900 Watts of Solar PV with solar tracking and combined 6500 Watt Backup Generator and battery bank giving 4KW of power.

http://www.mobilesolarpower.com/


Not really... I have a 5kw/generator in the RV already which is more than enough. I was just curious if they have 1-3 panels or something mobile to move 100ft away and keep the batteries juiced up.

That looks like something to keep your entire house juiced up or an entire camp.
Posted by: Comanche7

Re: Solar Electricity, A RV'ers Perspective. 1. - 08/24/09 12:50 AM

ToddW,

One caution to be aware of when adding distance between the solar panels and the battery banks, every inch of conductor (wire) added to the overall length comes at a price called VOLTAGE DROP. In the case of lower voltages and direct current, this can be a steep price to pay.

You will have a minimum to two conductors to complete the circuit) and this will increase the overall circuit voltage drop due to increased conductor resistance. Thus, if you locate your power source 100 feet from your load (in this case your battery bank/s) you will have 200 feet of conductor overall creating added resistance to your circuit supply voltage and creating voltage drop

Within certain practical standards this concern can be addressed by increasing the conductors cross sectional area by using a bigger conductor (i.e. going from a small wire #18 wire gauge to a larger #10 wire gauge). With proper up front planning / engineering this can be addressed within the limitations of your physical layout and available budget.

The trade off comes in practical aspects such as CO$T, flexibility, weight, handling time etc. With electrical circuits as in many other aspects of our lives, "there ain't no such thing as a free lunch".

Regards,
Comanche7
Posted by: Nomad

Re: Solar Electricity, A RV'ers Perspective. 1. - 08/24/09 02:00 AM

Originally Posted By: Desperado
Next slide please...

This has just recently come to the front of issues for me, and I need to have something going in the next week or so.


Well I won't get it done that fast. You might want to PM me with details and we can go from there. You do Skype? No cell phones etc where we are, but happy to do a video chat via skype

Originally Posted By: Todd W
I just cleared a nice area for my RV and realized I have a small problem... it's under very tall pine and oak trees and gets little sun. Sure, I could have parked it in the sun but then I have to deal with the heat, and problems associated with items left in the sun for long periods of time.

What do you for this scenario?


Comanche7 is right on about the wire length. I have not gotten to that part yet, but at 100' the wiring would be a real issue. The work around is to put the panels, a controller and a battery at the remote point. Add a small inverter and do the 100' run with AC, then put a charger in the RV. It will work, but it will be less efficient. However since you will probably not have a large demand unless you are living in the RV it may suffice. You would be better off running AC from the grid (if it is available) to charge your batteries than trying to use solar.

Will the camper be in "storage", occasional use or being lived in?

Nomad

Posted by: Todd W

Re: Solar Electricity, A RV'ers Perspective. 1. - 08/24/09 03:48 AM

Hi Nomad - It will be in storage on the property but may have an occasional visitor sleeping in it, and we`ll use it a dozen or so times a year for <60 mile trips to local camping locations.

Also, It probably won't get used until next spring due to winter preparations I have to do around here and then once it gets cold enough to snow it won't leave due to not being able to get back to my place.
Posted by: falcon5000

Re: Solar Electricity, A RV'ers Perspective. 1. - 08/24/09 06:57 AM

Todd, I leave my cells for the truck inside the front windshield. I park it half sun/shade type but if I had the luxury of running a line two it, I would either use a large diameter wire or double staking it with two smaller wires in parallel. When I use to work at the Rocket Ranch (Nasa), a lot of critical wires for sensors are ran double staked. It serves two purposes.
1. Adds redundancy in the event of a damaged/broken wire
2. Reduces the voltage drop of the wire by half and allowing more current to flow reducing energy wasted by the wires acting as a resistor giving it off in heat.

Look as a wire as a resistor, measure the wire at the distance say 100 feet, now put another 100 foot in parallel with that wire and remeasure, it should be half the resistance if the two wires are equal. Doubling your wire may get expensive but it is effective, a bigger wire may be less expensive. You would have to figure out the savings. I'm just saying there are several ways to do it, I would use a larger diameter wire with the shortest distance if possible.


Posted by: Desperado

Re: Solar Electricity, A RV'ers Perspective. 1. - 08/24/09 10:32 AM

Originally Posted By: Nomad
Originally Posted By: Desperado
Next slide please...

This has just recently come to the front of issues for me, and I need to have something going in the next week or so.


Well I won't get it done that fast. You might want to PM me with details and we can go from there. You do Skype? No cell phones etc where we are, but happy to do a video chat via skype


Nomad


No big deal. I was joking for the most part, as I was remembering college. If I have to jump on this too fast, I will just fund Camping World AGAIN.
Posted by: Todd W

Re: Solar Electricity, A RV'ers Perspective. 1. - 08/24/09 05:04 PM

Originally Posted By: falcon5000
Todd, I leave my cells for the truck inside the front windshield. I park it half sun/shade type but if I had the luxury of running a line two it, I would either use a large diameter wire or double staking it with two smaller wires in parallel. When I use to work at the Rocket Ranch (Nasa), a lot of critical wires for sensors are ran double staked. It serves two purposes.
1. Adds redundancy in the event of a damaged/broken wire
2. Reduces the voltage drop of the wire by half and allowing more current to flow reducing energy wasted by the wires acting as a resistor giving it off in heat.

Look as a wire as a resistor, measure the wire at the distance say 100 feet, now put another 100 foot in parallel with that wire and remeasure, it should be half the resistance if the two wires are equal. Doubling your wire may get expensive but it is effective, a bigger wire may be less expensive. You would have to figure out the savings. I'm just saying there are several ways to do it, I would use a larger diameter wire with the shortest distance if possible.


Great info thanks!!
Posted by: Nomad

Re: Solar Electricity, A RV'ers Perspective. 2 - 08/24/09 10:55 PM

Mounting the panels

Whichever panel type you choose, they must be mounted on the roof of the vehicle. Choose an area where there is no shadowing from other roof mounted items. In the case of the MC panels, even the shadow of an antenna like a CB whip can be detected as a power loss. A shadow area the size of your hand may reduce the output by 20%.

Panels work best when the flat surface is 90 degrees to the sun. Imagine a one foot square “beam” of sunlight. That one square foot will intercept the panel with the smallest area footprint when the beam is 90 degrees to the panels surface. If the panel is flat and the “sunbeam” is coming at a 45 degree angle, that one square foot of ”sunbeam” covers a much larger area, which means much reduced energy being captured by the panel.

Many folks have their panels mounted so that they can be tilted to the best angle for their l attitude and time of year. Some even have them mounted so they can be rotated to follow the sun. However, in practice, if you keep the panels within 20 degrees of the “sunbeam”, you will achieve about 90% efficiency.

Although I have mine mounted so I can tilt then, I opted to add more panels to offset the inefficiency induced by their being flat. I don't like to climb up on the roof and I don't have to worry about damage from the surprise 60+ mile per hour winds that happen in the desert. This works fine for me during all but the deepest winter days. Then the sun is at such a low angle that I sometimes do not have enough panel area to fully recharge my batteries. For that reason and some others, I carry a small 2kw generator (which I seldom use).

It is difficult to explain mounting methods due to the large variables in roof conditions. Some friends have built a grid like framework and attached the panels to the grid. I put mounting brackets in each corner and glued/screwed the brackets to the roof. My roof is rubber coated so I had to be sure that I used compatible adhesives.
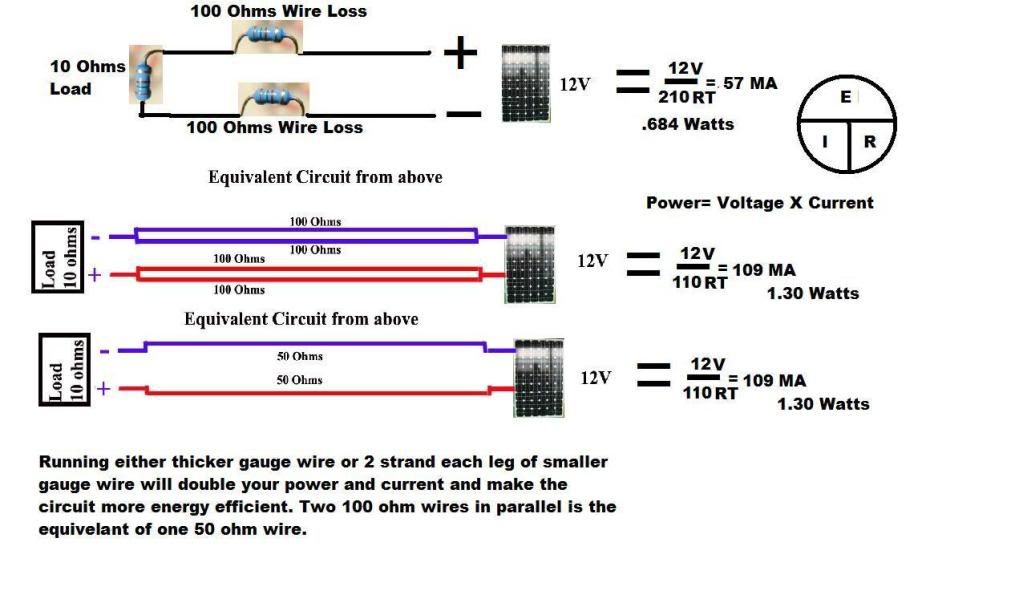
Wire:

This is probably the most overlooked component of most solar systems. Many professional installers will use wire that has much smaller current carrying capacity than needed. Voltage drop between the panels and the controller can result in wasting a good portion of your collected energy. It is best to keep the voltage drop below 5%, but 3% would be much better.

Here is a table showing how wire size affects current flow. This chart uses the formula;
Voltage Drop = Current x Length x Ohms per Foot.

Where:

  • Voltage Drop is the reduction of voltage at the load end of the circuit measured in volts. If the input voltage is 12 volts and the voltage drop is 4.2 then the voltage at the end of the wire pair is 12-4.2 or 7,8 volts.
  • Current is in amps.
  • Length is length of a single wire, The calculations below double that number for the total round trip wire length.
  • Ohms per foot is the resistance per foot.
Data is from a standards table.
The table assumes 12 Volts, 15 Amps & 35 feet of cable. The cable length is doubled in the calculation.


Wire
Gauge
Ohms
Per 100'
Voltage
% Drop
Voltage
Drop
Volts
@End
Watts
Delivered
Watts
Lost
.
164.024.2235.14 7.78116.7563.25Note 1
121.591.6713.910.33154.9925.01-
101.001.058.7410.95164.2715.73-
80.630.665.511.34170.119.89Note 2
60.40.413.4611.59173.786.22 Note 3
40.250.262.1711.74176.093.91-
20.160.161.3711.84177.542.46-

Note 1: Here the wire size is 16 gauge. I have seen #16 used in some professional installations. They ran the wire to the refrigerator feed circuit and then tapped off of that at the controller. Needless to say it did not work very well. The owner was told he needed more panels. In my typical 35 foot run only 7.78 volts are making it to the battery.

Note 2: Here 8 gauge wire is used. Note the % drop is now 5.5% with an end voltage of 11.34. This is usable but we are still loosing .66 volts.

Note 3: Now 6 gauge wire. Voltage drop is 3.46% with a resulting end voltage of 11.59. OK we can live with that.

I use #10 wire on the roof to connect each panel individually to a common point, From there I have #4 wire to the controller. Overkill? Well perhaps, but my losses are very small.

It is important to note that the wire should be stranded, not solid. Although solid wire does give better performance with DC, it is much more prone to break from vibration.

All terminals should be either positive screw type or crimped terminals. Do not use soldered connections. Two reasons.

One, a soldered connection puts all the vibration stress at the same point, right at the end of the solder mass. Vibration on the wire will cause a great deal of stress here and the potential for a break is high. Soldered connections are no longer allowed in aircraft and most military applications.

Crimps put the forces at random places on each strand. Although a strand may break, the applied forces will not be focused at the exact same spot and the cable will have a significantly greater mean time between failure.

Second, the wire must have an ultraviolet and abrasion resistant jacket. On our first camper, I used white “marine” grade wire and the jacket began to show signs of failure within two years. I don't know why Anchor Marine Grade wire is not UV proof, but it seems not to be. UV proof wire is black. So is direct burial wire, however some direct burial jacketing is not UV proof. Stands to reason, it is for underground use. No UV there.

Be sure to leave enough wire to allow for raising the panels. I put a bit extra so I can move the panels around if necessary when working on the roof. I dislike breaking the connections because I use “liquid electrical tape” to coat all the connections. I have used this underneath a vehicle exposed to Maine winters and after 5 years the connections were like new.

If wire must be run at right angles to the air flow and it is not securely fastened to the roof, (ie: a piece running between two supports several inches above the roof), put several twists in the wire. If it is flat, it will vibrate and quickly fail.

Running the wire through the roof is always scary. Many folks run it in through the refrigerator vent. If you do this, be aware of the heat generated by the refrigerator. Either shield the wire from the heat or run it as far away from the head convection path as possible.

It is far better to cut a hole in the roof, mount an acceptable waterproof connection box and seal the whole mess with suitable caulking. Remember that the rubber roofing now being supplied with most RV's does not like silicone based adhesives. Use the proper stuff like Dicor or equivalent.

Mine is run through the refrigerator vent. But only for a very short length and it is shielded from the heat. I run each panels cable to a common block just inside the camper on the interior wall near where the refrigerator vent goes. All connections are inside and provide easy access.

The panels can be wired in either parallel or serial configurations. Parallel wiring gives the same voltage but with increased amperage. Serial configurations give a higher voltage but with lower amperage. Both provide the same amount of energy. The advantage of the serial arrangement is that the wire can be smaller. But it produces either 24 or 48 volts. This is usually done only with systems that generate large amounts of power. Remember the wire size chart? Well careful investigation will disclose that for large amounts of current, large wire sizes are needed. Increase the voltage and the current drops so much smaller wire can be used. I have several friends with large solar arrays that use 24vdc serial systems. Otherwise the wires would be too thick to easily manage.

OK, we have the panels installed and wired. Next comess the Solar Controller
===================
Nomad

Posted by: Todd W

Re: Solar Electricity, A RV'ers Perspective. 2 - 08/24/09 11:28 PM

Nomad is rocking the Solar RV info smile

Thanks much!!
Posted by: falcon5000

Re: Solar Electricity, A RV'ers Perspective. 2 - 08/25/09 12:06 AM

Very good info Nomad, I know we always use crimps for wire on aerospace and military but I use solder connections in my truck for over 20 years with 0% failure, on a RV have you had any solder connection failures at wire splicing ends. I know we have connector pins and relays that are soldered to the components and have flown for over 30 years but I was wondering why they never solder splice the wires. You would think it would be stronger. I have seen many crimps fail from vibrations in the past. I know on the space shuttle we had high and low temp crimps and solder is useless in high temp areas or space apps due to extreme heat and cold. The truck never sees anything above 150 degrees high and 20 below low and haven't had any failures on solder yet when traveling. I never had a RV and I'm sure you have a lot more vibrations than the truck.
Posted by: Eugene

Re: Solar Electricity, A RV'ers Perspective. 2 - 08/25/09 10:25 AM

The use of solder or crimps will lead to long discussions on forums with people leaning both ways. I've seen plents of arguements both ways and many valid points. For example some some say its not the fact that a wire was soldered that causes the movement/vibration failure, its due to solder wiking up the wire and that a properly soldered joint won't have any issue. Its more due to field reparability, with a crimp tool a perfect crimp can be made most every time by just about anyone but it takes a lot of skill to make perfect solder joints every time. I've used both methods and seen failures in both so I can't see where one is absolutely better than the other.
Posted by: Nomad

Re: Solar Electricity, A RV'ers Perspective. 2 - 08/25/09 04:15 PM

Originally Posted By: falcon5000
Very good info Nomad, I know we always use crimps for wire on aerospace and military but I use solder connections in my truck for over 20 years with 0% failure, on a RV have you had any solder connection failures at wire splicing ends. I <snip>


I agree that there is a lot of discussion about crimp/solder. I have seen failures in both methods. One big reason for not soldering large current wiring is that should the terminal get hot, (bad connection at battery for instance) it could melt the solder and release the wire. frown

I have done some experiments where I repeatedly bent wire on both methods and the solder seemed to break quicker, but it was not a definitive test.

I appreciate the discussion, keep it up.

Oh, I redid the wire current carrying chart in the last post.


nomad


Posted by: falcon5000

Re: Solar Electricity, A RV'ers Perspective. 2 - 08/25/09 10:09 PM

Good points Eugene and Nomad, I know solder is probably useless on heavy gauge wire due to heating and I have seen bad solder joints fail but not many if any properly tinned and joined connections, usually before or after the joint will fail. Kind of like welding, the weld is stronger than the material. Heat is solders biggest enemy.
Posted by: RayW

Re: Solar Electricity, A RV'ers Perspective. 2 - 08/25/09 11:33 PM

Here is a website with a guideline for when to use solder or crimp.

http://svconline.com/mag/avinstall_crimp_connectors_not/

Don't know that all of it is absolute, but it is a good reference.

Posted by: Nomad

Re: Solar Electricity, A RV'ers Perspective. 3 - 08/27/09 02:06 AM

The Solar Controller:
The job of the controller is to regulate the voltage from the panels as it goes to the batteries. Batteries require very specific charge voltages at specific times in the charging cycle. As the battery becomes full, it acts somewhat like a tire being inflated.

In the early (or bulk stage,) large volumes of air (or electricity) are easy to push into the tire (or battery). The effort gradually becomes greater and greater until it takes a good deal of effort to push in a small amount of air. If you watch the pressure gauge it goes up more slowly and the pressure is much higher. This is also what happens when you charge a battery. At first the amperage will be high and the voltage low. The amperage will gradually decrease and the voltage will rise. It is this rising voltage that we need to be concerned with.

There are 3 stages to the charge cycle.
Bulk Charge: This stage dumps as much power into the battery as possible. Most standard wet cell batteries (Car batteries are wet cell batteries also called flooded cell batteries) can accept charges to 10% of their amp hour capacity. Other types like AGM (Absorbed Glass Mat – described later) can take much more current. In either event unless you have a Reallllllly big solar array, you won't hurt the batteries at this point in the charge cycle.

Acceptance Charge: To get that last bit of air in the tire requires a higher pressure for a longer time. With the battery, the controller holds the voltage at a specific high voltage for a specific time. The actual voltages and time varies with the battery type and the battery manufacturer ratings should be used, not the ratings that may come with the controller.

Float Charge: Finally the voltage is reduced to a lower level which is used to hold the battery at the “full” point as it sits unused, or with a small load. Most batteries (with some exceptions) gradually loose their charge over time due to internal resistance. The float charge is designed to replace this internal loss.

Do not use a controller unless it has these 3 stages and you must be able to control the voltage at the acceptance level and the float charge level. These settings are critical to good longevity of your expensive batteries. Again, use the battery manufacturer recommendations for your exact battery model.

Solar controller mumbo-jumbo is second only to battery mumbo-jumbo. Be very careful to read and understand what the vendor is saying. Compare the various types and consider your application, not some hypothetical case. Seek good advice, which is not usually from either the manufacturer or vendor.
I will get into the specific numbers later when we discuss batteries.

Another feature of the charge controller, is how it manages the voltage. Here comes the mumbo-jumbo part. Some manufacturers use special circuits that are advertised to increase the efficiency of the controller by up to 20%. I have yet to see any real conclusive test results that verify that claim. These controllers are much more expensive and it appears to me that they contribute that additional 20% only under very specific conditions. But again, I have not seen any specific test data so you are on your own here.

Mounting the controller has a few tricks. It is common to mount the controller someplace convenient for the installer, or the user if the controller has a built in display. I frequently see these controllers mounted above the refrigerator. It provides a convenient location for the display.

However, remember that the controllers job is to provide a precise voltage to the batteries. If the controller is located a long distance from the batteries, it may be sending 14.4 volts out of its terminals, but the wire resistance (remember that from the section about wire?) will reduce that voltage to some extent. The problem is that we need to control that voltage to within 1/10 of a volt. So the controller may be sending 14.4 but the batteries see only 13.9. As a result, the batteries never get fully charged. Batteries must be periodically fully charged or they will fail very early.

Therefore the controller should be mounted as close to the batteries as possible. However be careful. Remember that flooded cell batteries give of hydrogen which is explosive. You don't want the controller in the same air space as the batteries. Also the fumes in the battery compartment are somewhat corrosive. I have seen controllers that have failed because of corrosion.

Remember that we are working within a very small voltage range. Using my batteries as an example (yours will be different) the full charge voltage is 12.8. The 50% charge point is 12.2. It is best to limit your discharge rate to 50% of the batteries capacity. So called Deep Discharge Batteries are no exception. This leaves us with a working range of only 12.8-12.2 = 0.6 volts between full and (functionally) discharged.

A small digression. The life of a battery is directly related to the amount and depth of discharge. If you only discharge your battery a little bit, it will last significantly longer than a deeper discharge. We will get into that more in the battery section.

So one can see why putting the controller at a distance where there might be significant line loss is a bad thing. Even one or two tenths of a volt line loss between the controller and the battery is significant..

But there is another consideration.

Temperature Compensation.
Anyone that has tried to start a vehicle in winter has experienced the effect that cold weather has on batteries. Heat has an effect as well.

Remember we are dealing with only 0.6 volts from full to empty. During cold weather batteries need a higher charge voltage and during warm weather a lower charge voltage. I use a special type of battery called AGM (Absorbed Glass Mat). We will discuss what that is all about later, but they have a slightly different temperature compensation need than the typical flooded (golf cart or deep discharge) battery.

Here is data for my Lifeline 31T AGM batteries. Your system will have different values, but the concept will be similar. ( Data lifted from a Lifeline datasheet that came with my batteries).


Note the variation in float voltage for the manual system. From freezing to hot is a range of 0.8 volts. Greater than the voltage range from full to empty!! A temperature compensated controller is a must have item.

Many dealers will tell you that their controller is temperature compensated, but the compensation is monitored at the controller. It must be monitored at the battery. My controller is a Trace C-40 and it is about 14 years old. It has a phone type socket into which one plugs a cable ending in a small temperature sensing module. This module is glued to the side of one of the batteries.

This leads us to the next item... Batteries.
Posted by: Nomad

Re: Solar Electricity, A RV'ers Perspective. 3 - 08/30/09 01:22 PM

Battery Types:

There are 3 types of batteries in common RV use; Flooded Cell, Gell Cell and Absorbed Glass Mat.

Flooded Cell Batteries:
By far the most common battery used it the flooded cell battery. It comes in many “flavors” from deep cycle to golf cart. Each has their own particular composition.

An automotive battery is a type of flooded cell. It is most easily recognized by the removable caps and the liquid electrolyte. The chemical composition and mechanical construction of the car battery makes it able to provide a very quick transition from chemical energy to electrical energy at very high (300-500 amps) current. However they do not do well in sustained, low level (10-20 amp) discharge applications.

Deep Discharge batteries have a different chemical and mechanical composition. The lead is mixed with different alloys, the plates are a different shape and the internal structure of the battery is different. A deep discharge battery will not do well if subjected to a 300 amp discharge.

Although there is an intermediate battery called a Marine Starting Battery that has some of the characteristics of both the automotive battery and the deep discharge battery. It does both, but does neither as well as the two alternatives when used for their specific applications.

Gell Cell Batteries:
Gells are similar to deep discharge batteries except that the electrolyte is not a liquid, but a gell. There is no filler cap and no maintenance. Although the battery is “spillproof” it must be mounted for use in its normal vertical position. Inverted or on its side mounting will severely reduce its life.

Gells are very susceptible to overcharge and overdischarge. They do not do well in high current applications like starting heavy engines. They are not good for hi vibration applications. The no maintenance and spillproof features made them quite popular with the high end RV motorhome manufacturers. However in severe vibration applications like off road RV's, boats and aircraft, their frailty was problematic.

The gel is created by the addition of finely divided silica or sand mixed with a sulfuric acid solution. The gelled electrolyte is highly viscous and during charge or discharge often develops voids which impede acid flow and result in reduced battery capacity. As these voids progress, more and more plate area is left dry and unable to provide a path for the ionic flow thus progressively reducing the capacity of the battery.

Absorbed Glass Mat Batteries:
This battery type was a recent entry in the battery world. The need for a battery that would survive high vibration, run in any position, provide very high current draw, allow very high charge rates and be sealed, so that it did not vent explosive gasses came about with the advent of the stealth aircraft and some highly aerobatic missiles.

This battery is much like the flooded battery with some major changes. First, the electrolyte is contained in a saturated microfibrous silica glass mat. This made it possible to provide much better support for the plates. Also, the plates could be thinner and there could be more of them so the surface area of the plates could be greatly increased. This provided the very high charge/discharge rates as the conversion from electricity to chemical back to electricity is very dependent on the surface area of the plates. The electrolyte is still liquid and remains so for the life of the battery.

There is a valve in the battery that creates a positive pressure in the cell that confines any gasses produced during operation. These gasses are then recombined into water. Since the glass mat is only about 90% saturated with electrolyte, the oxygen produced during charge can readily migrate to the negative plate and recombine into water. This recombination method along with charge voltage control substantially reduces water loss making the battery non-spillable and maintenance free. The batteries can be located in regular living space without special venting.

This closely packed plate arrangement means that there is a much lower internal resistance. I left two of these batteries in an unheated shed through two Maine winters. Upon my return I was able to use one of the batteries to drive a light for many hours as I worked in the shed. Internal discharge is less than 3% per month at 77 degrees and substantially less at lower temperatures.

The number of discharge cycles for the AGM is considerably greater than for either flooded or gell batteries. At the 50% discharge level one can expect about 300 discharge cycles for the flooded cell, about 350 for the gell and between 1000 – 1500 discharge cycles for the AGM.

The trade off is that the AGM batteries are slightly heavier and larger than an equivalent rated flooded cell. AGM's require a closely monitored voltage regulated charging system and they are considerably more expensive. I found a 105 amp hour Lifeline AGM for $289 + 54 for shipping = $343 each. A standard flooded cell deep discharge battery goes for about $60-80.

Battery Ratings:
Batteries are rated by how long they will provode a specific amount of current. Most RV batteries are rated at a 20 amp discharge rate. This means that a 105 amp hour battery will provide 5.25 hours of current before reaching its fully discharged state. This is usually about 10.5 volts. However discharging a battery to its fully discharged state will greatly reduce its lifetime. The standard discharge level is 50%.

A 105 amp hour battery therefore has only about 52 amp hours of useful energy. It can provide 1 amp for 52 hours, 2 amps for 26 hours or any other combination of amps * hours that approximates 52 as long as the demand is at 20 amps or below. The rating will be considerably different if you are discharging at 100 amps. So be sure to see what the actual discharge rating is before you purchase a battery. Some are rated at the 20 amp discharge rate some at a 5 amp discharge rate, some at 100. It mostly depends on the type of service for which the battery is intended.

So lets say you estimate your demand for a 24 hour period is 100 amp hours, and that you want to have 3 days of power. Then you would need 300 amp hours. But to remain above the 50% discharge rate, you need to double that and have 600 amp hours of battery.

Next: Inerters.
Posted by: Desperado

Re: Solar Electricity, A RV'ers Perspective. 3 - 08/30/09 01:34 PM

This is good stuff. I really appreciate it.
Posted by: Todd W

Re: Solar Electricity, A RV'ers Perspective. 3 - 08/30/09 03:05 PM

Hey Nomad- If i`m not mistaken Optima are AGM and can be found for $130-$170 depending on the model.

http://www.dcbattery.com/optima2.html

Also Nomad, are you going to talk about discharge amps when you talk about inverters because if I`m not mistaken in your discussion of Battery Ratings above you were talking about direct 12v discharge and not the "converted" 120v discharge. I am curious about an appliance that utilizes 120v/5amps what that is through the inverter to the 12v/batteries???
Posted by: Nomad

Re: Solar Electricity, A RV'ers Perspective. 3 - 09/01/09 03:40 PM

I am sorry to report that I have lost my internet connection. Seems like the LNB on my satellite system has failed. I am using a friends connection, for the moment. Therefore I have to end this thread. It is probably long enough as it is.

If (when) I resolve the internet connectivity issue, I will continue the thread on my web site which at the moment is very out of date.

I will post a note here when I get back online.

Glad you found the posts useful. I will continue to write, hopefully I will get to update my web page in the not to distant future. I appreciate all the comments. Much of them will be incorporated into the stuff I put on my web site.

Web site is www.nomads-notebook.com


...Ron, aka Nomad.